
Using Informatica Normalizer Transformation

Normalizer transformation is a native transformation in Informatica that can ease many complex data transformation requirements. Learn how to effectively use normalizer in this tutorial.
What is a Noramalizer Transformation?
In a snapshot, here is what a Normalizer is or does:
- Active Transformation
- Can output multiple rows for each input row
- Can transpose the data (transposing columns to rows)
A Normalizer is an Active transformation that returns multiple rows from a source row, it returns duplicate data for single-occurring source columns. The Normalizer transformation parses multiple-occurring columns from COBOL sources, relational tables, or other sources. Normalizer can be used to transpose the data in columns to rows.
Normalizer effectively does the opposite of what Aggregator does!
Transposing data using Normalizer
Let's imagine we have a table like below that stores the sales figure for 4 quarters of a year in 4 different columns. As you can see each row represent one shop and the columns represent the corresponding sales.
Next, imagine - our task is to generate a result-set where we will have separate rows for every quarter. We can configure a Normalizer transformation to return a separate row for each quarter like below..
The following source rows contain four quarters of sales by store:
Source Table:
| Store | Quarter1 | Quarter2 | Quarter3 | Quarter4 |
| Shop 1 | 100 | 300 | 500 | 700 |
| Shop 2 | 250 | 450 | 650 | 850 |
The Normalizer returns a row for each shop and sales combination. It also returns an index - called GCID (we will know later in detail) - that identifies the quarter number:
Target Table:
| Store | Sales | Quarter |
| Shop 1 | 100 | 1 |
| Shop 1 | 300 | 2 |
| Shop 1 | 500 | 3 |
| Shop 1 | 700 | 4 |
| Shop 2 | 250 | 1 |
| Shop 2 | 450 | 2 |
| Shop 2 | 650 | 3 |
| Shop 2 | 850 | 4 |
How to use Normalizer transformation inside Informatica Mapping
Now that you know the concept of a normalizer, let's see how we can implement this concept using Normalizer transformation. We will take a different data set for our example this time. Suppose we have the following data in source:
| Name | Month | Transportation | HouseRent | Food |
| Sam | Jan | 200 | 1500 | 500 |
| John | Jan | 300 | 1200 | 300 |
| Tom | Jan | 300 | 1350 | 350 |
| Sam | Feb | 300 | 1550 | 450 |
| John | Feb | 350 | 1200 | 290 |
| Tom | Feb | 350 | 1400 | 350 |
and we need to transform the source data and populate this as below in the target table:
| Name | Month | Expense Type | Expense |
| Sam | Jan | Transport | 200 |
| Sam | Jan | HouseRent | 1500 |
| Sam | Jan | Food | 500 |
| John | Jan | Transport | 300 |
| John | Jan | HouseRent | 1200 |
| John | Jan | Food | 300 |
| Tom | Jan | Transport | 300 |
| Tom | Jan | HouseRent | 1350 |
| Tom | Jan | Food | 350 |
Continued .......
Now below is the screen-shot of a complete mapping which shows how to achieve this result using Informatica PowerCenter Designer.

Please click on the above image to enlarge it. You can see after the Source Qualifier, we have placed the Normalizer transformation. In the next section, I will explain how to set up the properties of the normalizer.
Setting Up Normalizer Transformation Property
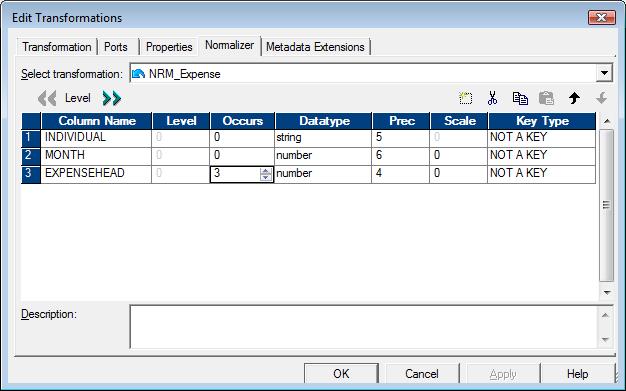
First we need to set the number of occurrences property of the Expense head as 3 in the Normalizer tab of the Normalizer transformation. This is because we have 3 different types of expenses in the given data - Food, Houserent and Transportation.
As soon as we set the occurrences to 3, Normalizer will in turn automatically create 3 corresponding input ports in the ports tab along with the other fields (e.g. "Individual" and "Month" fields). These 3 input ports, as you can see in the above image, are EXPENSEHEAD_in1, EXPENSEHEAD_in2, EXPENSEHEAD_in3. We have connected these input ports with food, house rent and transportation from the source qualifier. Below image shows the setting up of number of occurrences property.
Next, In the Ports tab of the Normalizer the ports will be created automatically as configured in the Normalizer tab.
But, Interestingly we will observe two new columns here. They are ,
- GK_EXPENSEHEAD
- GCID_EXPENSEHEAD
See these ports in the below screen shot. Again, if you need - please click on the image to enlarge it.
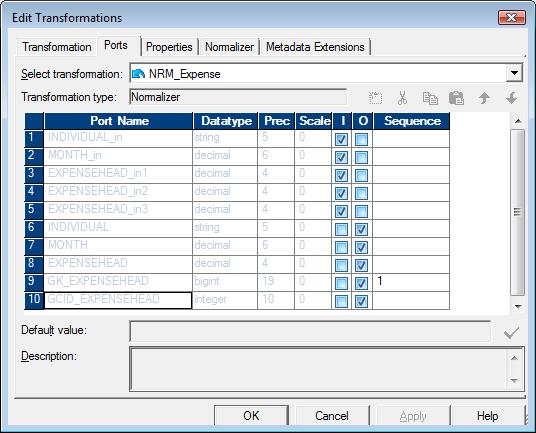
GK field generates sequence number starting from the value as defined in Sequence field while GCID holds the value of the occurrence field i.e. the column no of the input Expense head.
In our case, 1 is for FOOD, 2 is for HOUSERENT and 3 is for TRANSPORTATION. Now the GCID will give which expense corresponds to which field while converting columns to rows.
Below is the screen-shot of the expression to handle this GCID efficiently:
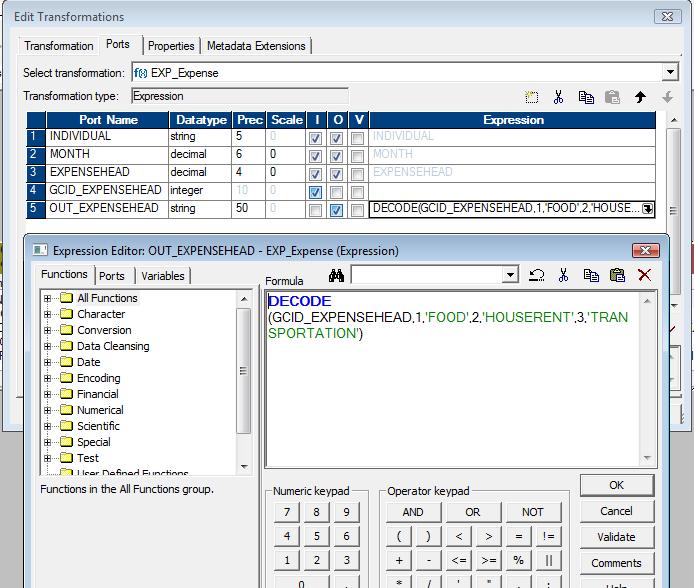
As you can see above, the DECODE statement is used to assign proper level to the output expense head field