
Real Time Jobs in Data Services

SAP Data Services provides Realtime Data Integration features. Data Services can generate realtime event messages and can also listen to input XML messages. Real Time Job means, some message with content will trigger the Job or Dataflow processing. A RealTime Job is started once and keeps running basically for ever. So Data Services acts like a server process.
Data Services can be connected to different message bus systems as well as other EAI tools in a System/Application Integration environment. In fact, Data Services has a lot of EAI functionality. When compared to an EAI tool, Data Services is much easier to use and it also provides all the transformations in realtime dataflows as well. Data Services is recommended to be used in realtime applications when rich transformations are required else EAI tools are preferred for high performance connections between two transaction systems.
On the other hand, Data Services does not support Two Phase Commits unlike the EAI tools. However, it guarantees delivery on at-least-once basis only. Hence the dataflow design should deal handle scenarios where the same event may be processed a second time in a recovery case.
Implementation
Let us build a RealTime Job and DataFlow, that takes a source XML based message and returns a result message. Here, Data Services will act like a Server. Other systems can send messages to Data Services, which will be processed and a response will be sent back on a realtime basis.
In this tutorial we will create a RealTime Job exposed as a Web Service that will accept an Employee Id as an Input parameter and will return the Office Location of the employee as response. Here we will keep the source and target message formats as simple as possible. The main objective is to learn how to develop a Real-time Job and next to expose the same as a Web Service.
Utility tools used
1. trang.jar- We will use this command line utility to generate a XML schema definition file (XSD) from a XML file.
We can download the same from https://code.google.com/p/jing-trang/downloads/list
2. clienttest- This utility reads a XML file and send this as a message to the RealTime Service and the response message is displayed.
This is a very convenient method to test the setup of the Service and to perform load tests by sending the same message multiple times. This utility is found in the Data Services BIN directory i.e. LINK_DIR\bin
3. soapUI- We will use this tool to test the Real-time Job exposed as a Web Service, by passing realtime input messages to it.
We can download the same from http://www.soapui.org/
Create Real-time Job and Data flow
1. Let us create a very simple XML Message Source, say Msg_Emp.xml as below:
<?xml version="1.0"?>
<employee>
	<EMPNO>8888</EMPNO>
</employee>
Also we create a response XML Message Target, namely Msg_Loc.xml as below:
<?xml version="1.0"?>
<location>
	<Message>Success</Message>
	<EMPNO>8888</EMPNO>
	<LOC>DALLAS</LOC>
</location>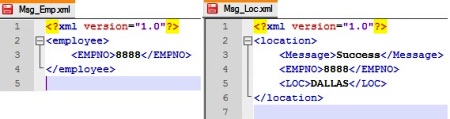
2. Next we generate the XSD schema definition for the above two XML files using trang.jar utility. Open command prompt CMD, and go to the directory where the trang.jar utility is located. Next use the below command:
cd [trang_jar_directory]
java -jar trang.jar [Source_XML_file] [Target_XSD_file]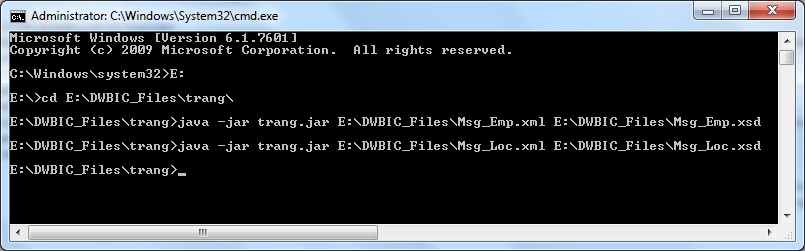
3. Next go to Formats in Local Object Library. Create a New XML Schema Format with Name say Msg_Emp with File name as the employee xsd. E.g. E:\DWBIC_Files\Msg_Emp.xsd
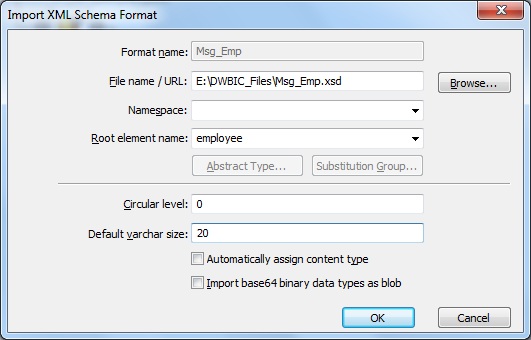
Similarly define the file format for the response schema.

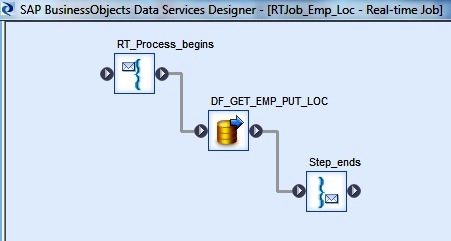
4. Next we create a New Real-time Job in the Local Object Library or in the Project Area of a project. Let's name it as RTJob_Emp_Loc.
This automatically creates the components RT_Process_begins and Step_ends, which marks the start and stop of a Real-time Job.
5. Next we add a Data Flow in between the two realtime process components. Let's name the dataflow as DF_GET_EMP_PUT_LOC.
6. Next we go to the dataflow workspace to design the dataflow. Use the Msg_Emp XML Schema from the Local Object Library and select Make XML Message Source. Also select the other response schema Msg_Loc and Make XML Message Target.
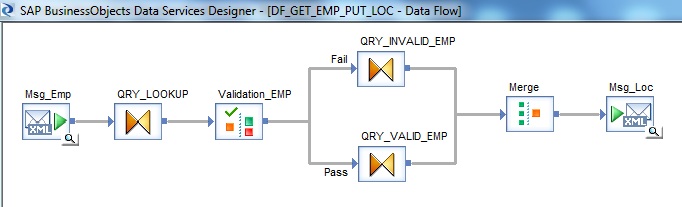
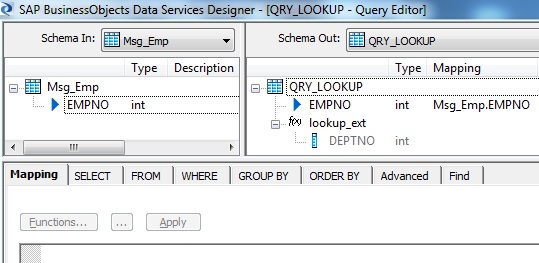
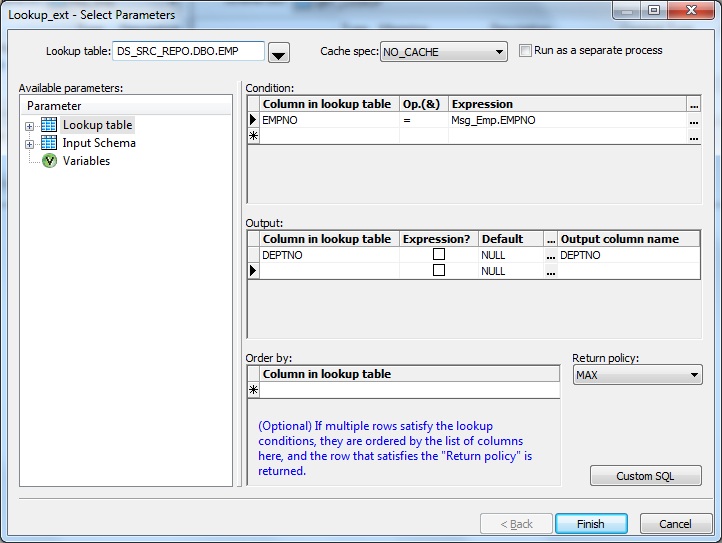
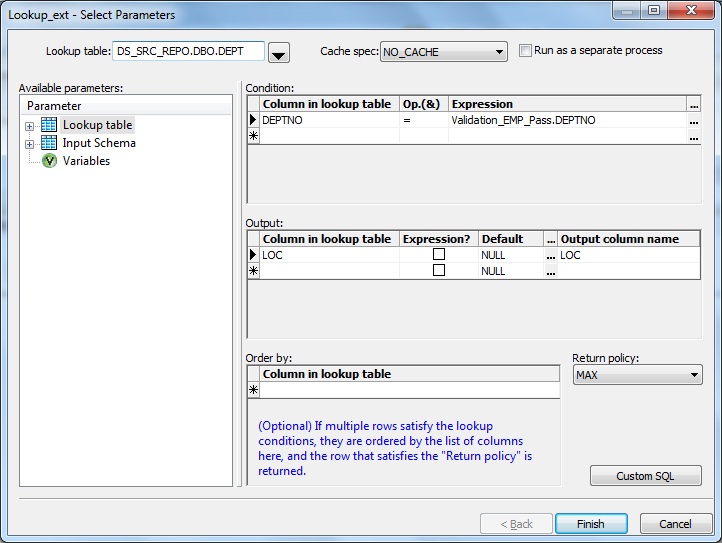
7. Add a Query transform after the XML Message source. Create a New Function Call to lookup the EMP table to find the corresponding department number of the input employee number using lookup_ext() function. Set the Cache spec of lookup to NO_CACHE.
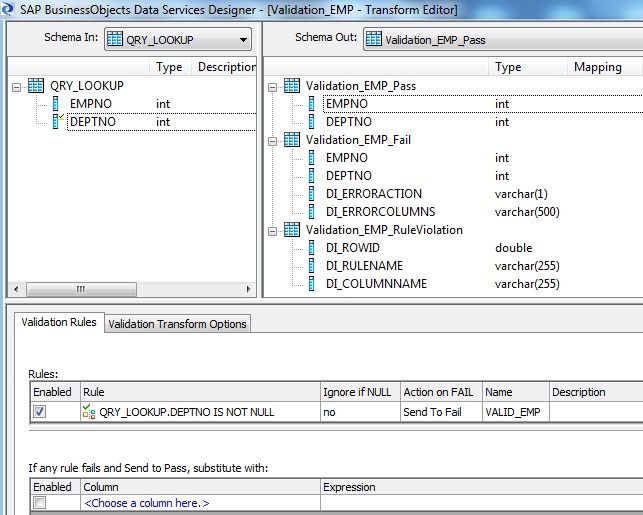
8. Next we use a Validation transform. If the Employee number does not exists in the employee table the corresponding lookup result will return NULL value. We capture the lookup failure using the Validation transform.
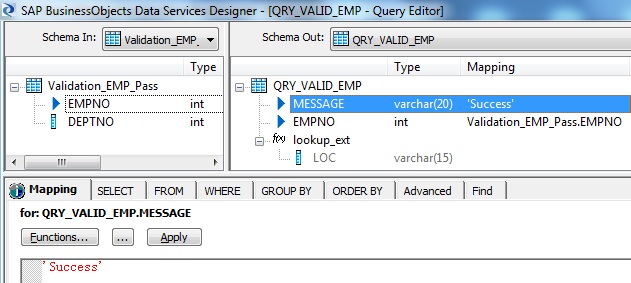
9. The Validation Pass record is further processed in another Query transform namely QRY_VALID_EMP. Here we lookup the Department table to get the Location information. Similarly use New Function Call to lookup_ext with Cache spec set to NO_CACHE
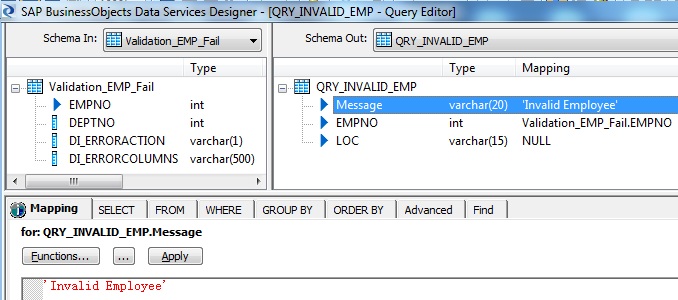
10. The failed record from Validation transform is passed to another Query transform namely QRY_INVALID_EMP. We assign an Error message over here, to be sent as response.
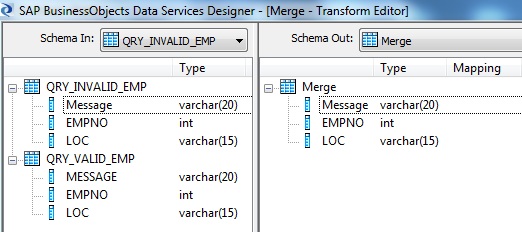
11. Finally we use a Merge Transform to merge both the pipelines and link it to the XML Message Target.
The Realtime Job design is complete.
IMPORTANT NOTE:
A RealTime DataFlow keeps running forever once the Real-time Job is started. Therefore, while using all kinds of caching we must be very careful. While using caching, the CACHE will get loaded the first time and will never get updated. Caching might not only happen while using lookups in PRE_LOAD_CACHE mode, but also when joining Tables (set the table reader Caching to no) or while using Transforms like Table Comparison.
Also while using a Key Generation, the initial key is read at the beginning and then just increased by one for each row. So if any other Data Flow writes into the same target table, then sooner or later it may produce primary key violations.
Testing the Dataflow in a Real-time Job
1. For the XML Message Source, provide a XML test file say, E:\DWBIC_Files\Msg_Emp.xml
2. For the XML Message Target, provide a XML test file say, E:\DWBIC_Files\Msg_Loc.xml. Additionally Select the option Delete and re-create file.
3. Next Execute the Real-time Job and check the result is as expected or not.
Access Server
Access Server is responsible for all Realtime processing in Data Services. It takes care for multiple message processing, message queing etc. Where as the Job Server is responsible to execute the Realtime Job and process the Dataflow as usual. Let us see the steps to configure an Access Server.
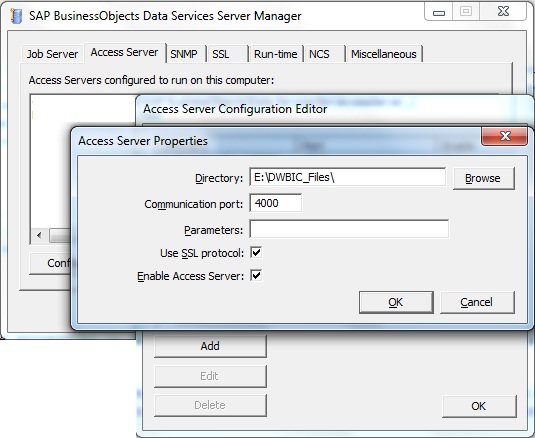
1. Go to Data Services Server Manager. Next go to Access Server Tab. Go to Configuration Editor. Next click on Add. Provide a directory location where the configuration and log files will be written. Next use a non-conflicting Communication Port number. Once the Service is restarted we will see in the Windows Process List an additional entry call to AL_AccessServer.exe.
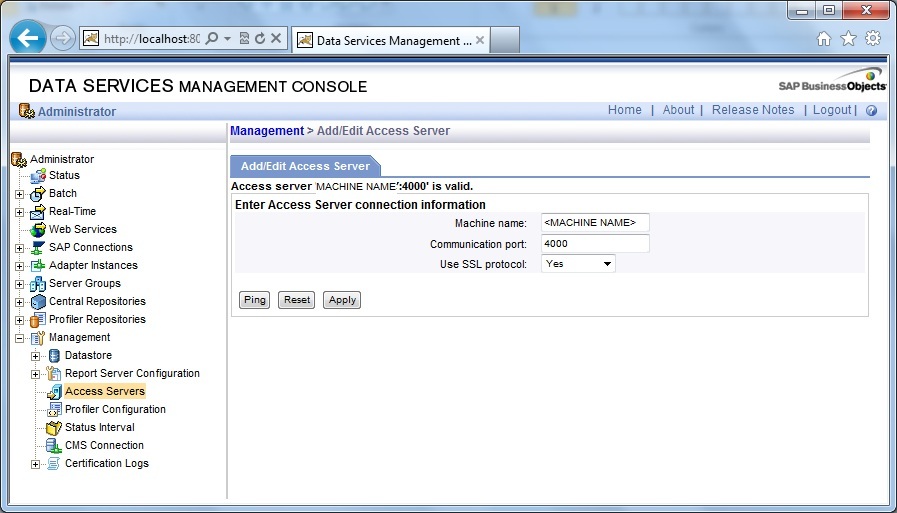
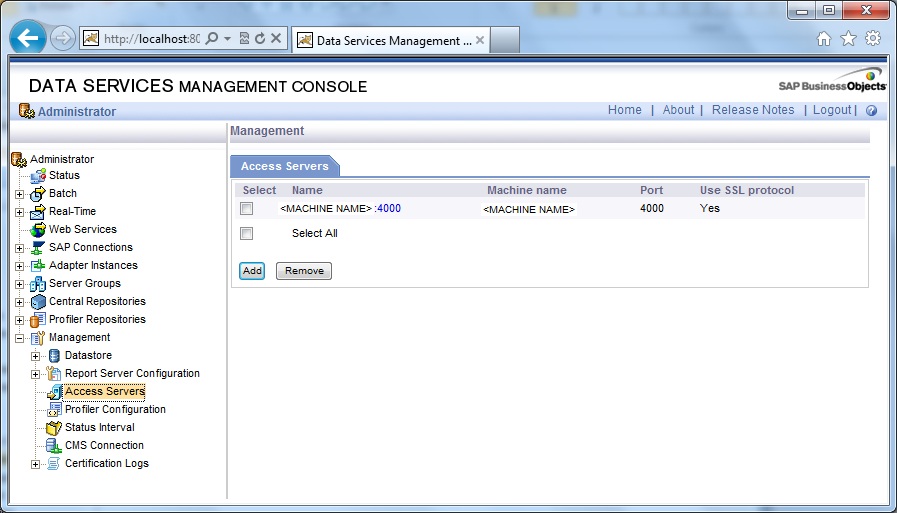
2. Next go to Data Services Management Console- Administrator. Next go to Management- Access Servers. Click on Add. Enter the Machine name followed by Communication Port number. Next click Ping to test and finally Apply.
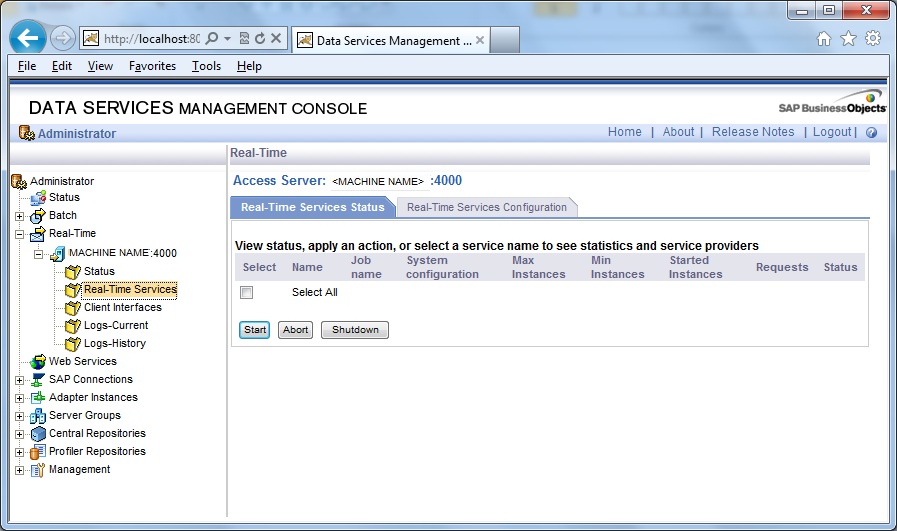
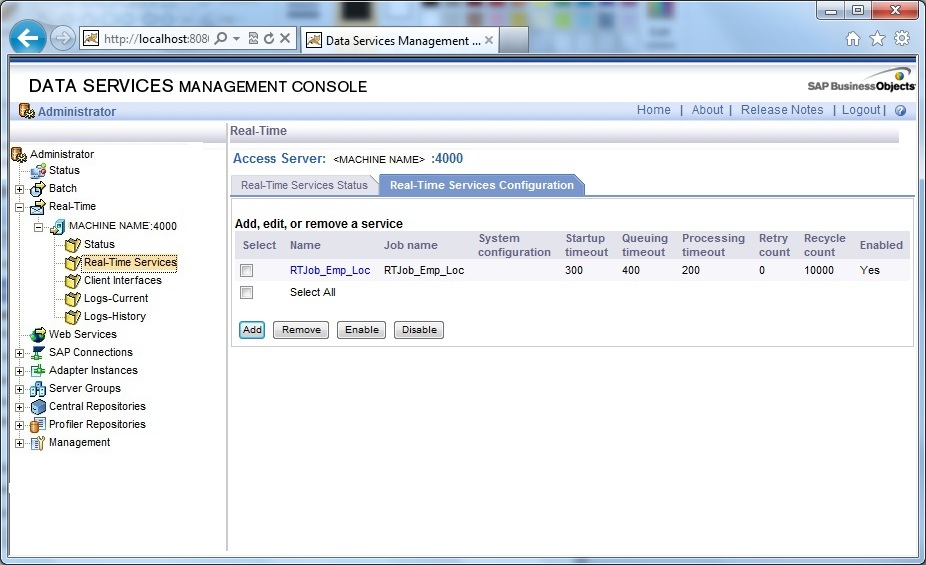
3. Next go to Real-Time, followed by the Access Server we have configured. Next go to Real-Time Services. Go to Real-Time Services Configuration tab.
4. Click on Add. Enter a Service Name and Browse and select the Real-Time Job. Next Add and select a Job Server associated with the local repository and finally Apply.
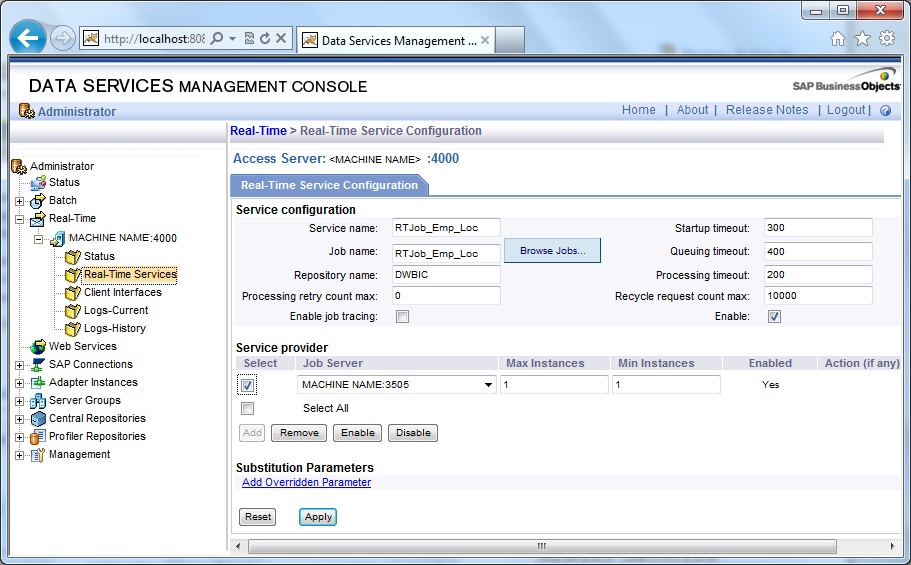
5. Check Real-Time Service Status is showing as Service Initialized.
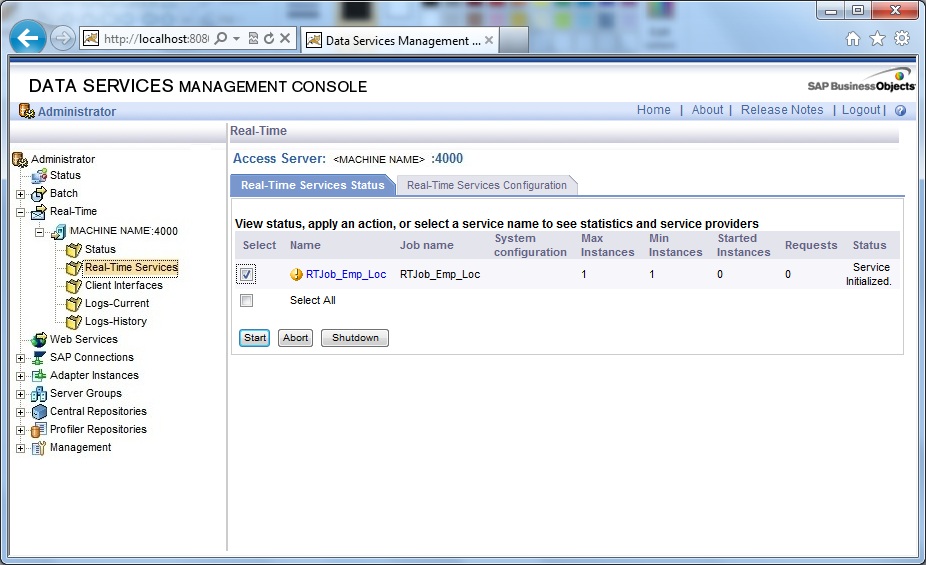
6. Next select the Service from Real-Time Services Status tab and click Start, the Status will be displayed as Service Started.

Now we are ready to use this realtime service and send messages to it. Check again the process list in Windows, we will find one al_engine.exe process constantly running and waiting for a first message to come.
Testing Real-Time Job
Next we can test the Real-Time Job using the DS provided utility clienttest.
1. Open Command Prompt cmd as Administrator and go to LINK_DIR/bin.
2. Next use the clienttest test utility with the arguments syntax as below:
cd LINK_DIR/bin

clienttest -A[MachineName] -p[PortNumber] -S[ServiceName] -X[XML MessageSourcePath]
e.g.
cd C:\Program Files (x86)\SAP BusinessObjects\Data Services\bin

clienttest -AEtlServer -p4000 -SRTJob_Emp_Loc -XE:\DWBIC_Files\Msg_Emp.xml
Also check in the Management Console, the number of Request processed by the Realtime Service along with the properties like- Average processing time, Average queuing time etc.
Configure Real-time Job as a Web Service
Next we will configure the Real-time Job Service as a Web Service.
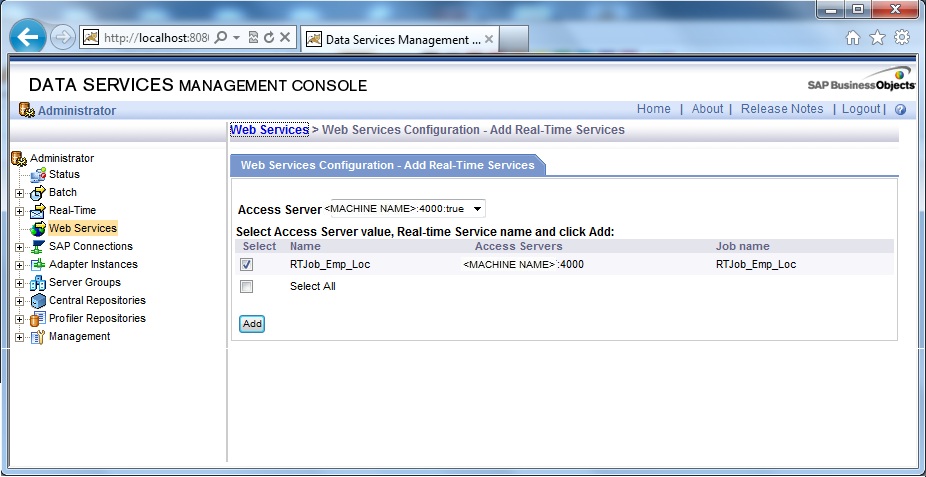
1. Go to Data Services in Management Console. Next go to Web Services Configuration tab. Select Add Real-time Service from the drop down menu and click on Apply.
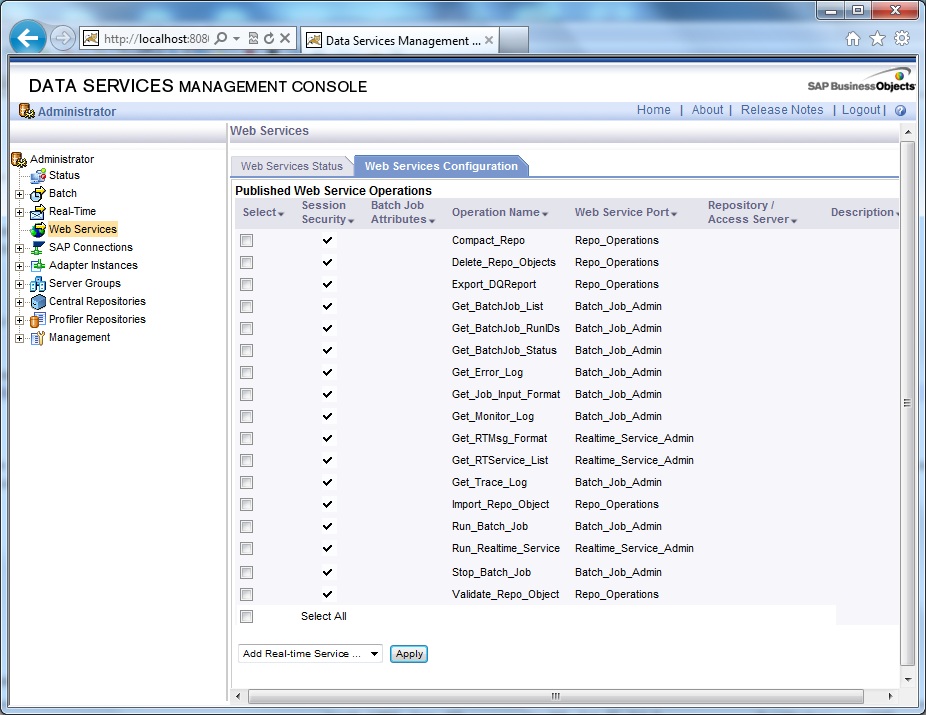
2. Select the Access Server from the drop-down selection box. Next select the check-box of the Real-time Service and click Add.
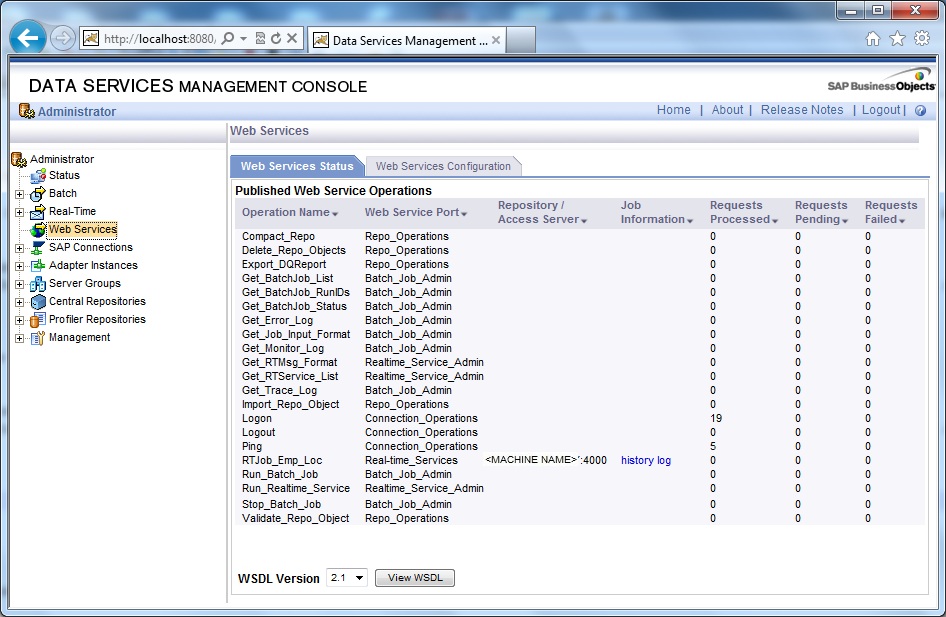
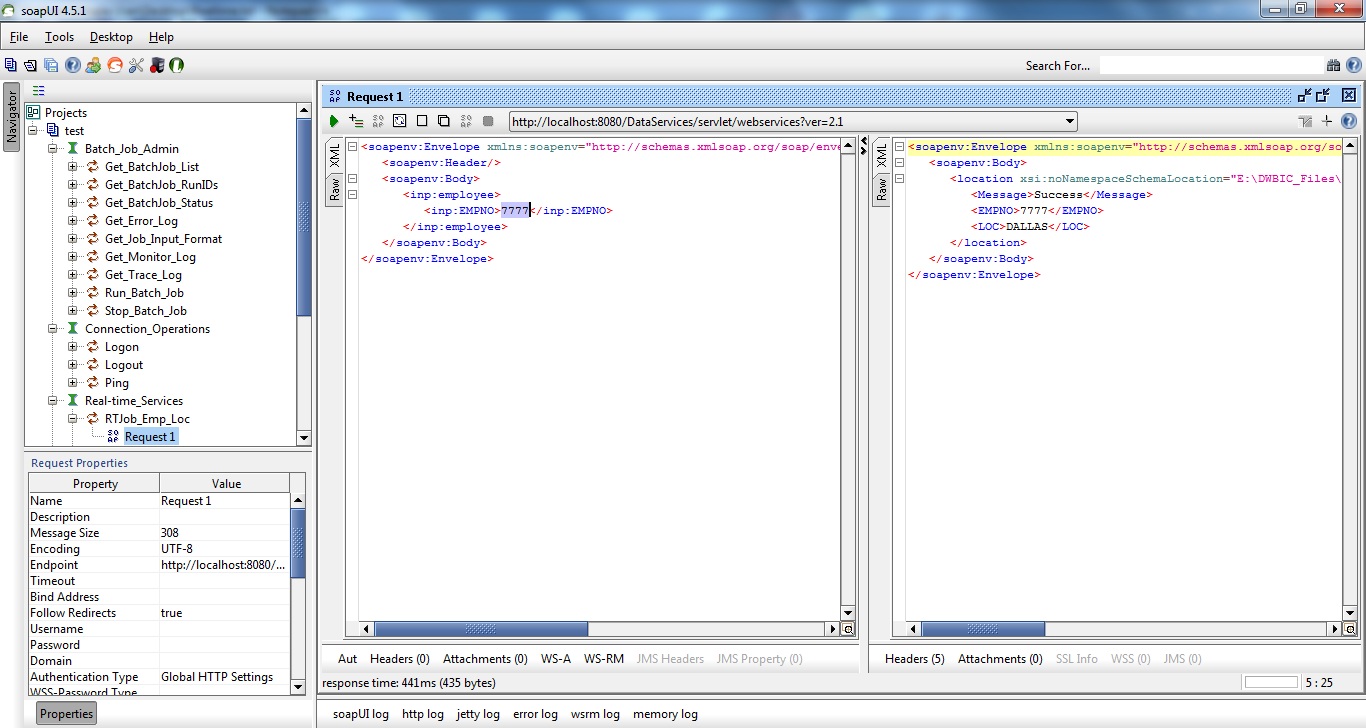
Testing Web Service
Use the soapUI utility to pass realtime XML messages to the Web Service we have configured. The below is the WSDL file to be used:
http://[machine_name]:8080/DataServices/servlet/webservices?ver=2.1&wsdlxml
Finally we have learnt how to create a Real-Time Job in Data Services, how to configure the Real-time service, how to test the Job and finally to expose the real time service as a Web Service.
